Gluing cracks – More control with tower blocks
The following method for gluing cracks involves affixing temporary tower blocks to the inside of a violin, viola our cello top or back, with G – clams and a wedge providing clamping force. I have found that this method he Gives better results than can be achieved with the conventional stretcher clamps, multiple cracks can be opened cleaned and glued at the same time. The force used for closing cracks is transmitted directly to the crack area, cracks that are under tension can be closed, cracks starting at the top and bottom extremities can be closed with ease. The only disadvantages I have found is that this method can be more time-consuming than others and might not be cost efficient for less valuable instruments.
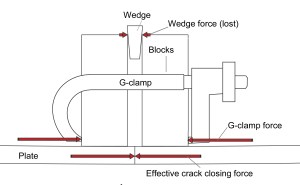

First of all I clean the inside of the plate to avoid the risk of the blogs becoming unglued. Then I chalk it and glue stop-studs [send enough to allow the plate to flex a little] to prevent the cracker from opening further while I work on it.Next I fit and glue the blocks. Higher blocks[12 x 12 x 30 mm] are generally preferable. A large based area and ensures a strong bond to the plate. If the blogs are too low, a large amount of clamping force is lost towards the top of the block.

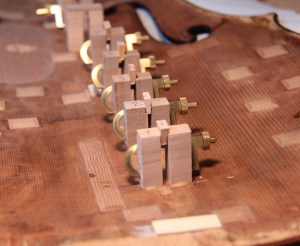
Stop-studs and connected double tower blocks are convenient to chalk fit. I glue them to the plate with yellow glue, which is softer than hide glue, to minimize the risk of chipping original plate material during removal. An additional drop of glue on the back of the block improves bonding strength. Once dry, I cut the top to accommodate the wedge
For a dry run, I put all clamps and wedges in place and check the leveling and correct continuation of the arching on the varnished side. Then I removed the wedges and clams, and line them up on the side. It is not necessary to mark the exact position of the wedges because we might have to push them further in, to compensate for the glue causing the wood next to the crack to swell.

I use glue with a low gel strengths, which gives me a comfortable long working time. I gently warm the plate and then I apply the glue on the side that opens more easily. Flexing the plate, I work in the glue in until it appears on the other side, so that I can be sure that the glue has penetrated thoroughly. I clean the glue from the varnish immediately with a humid paper towel, but avoid wetting the crack too much ass this will cost the wood to swell making it difficult to judge and correct the level afterwards.
When it comes to leveling the crack, I preferred to use my fingers. They are soft and will damage and neither the wood nor the varnish. I use a ruler or precision straight edge to check that the crack level and that the arching is neither too pointed nor sunken.

If the arching is sunk in the correct area, by slightly pull that wedge out, or push it towards the plate and the opposite case. If one side is higher I level it by pushing with my fingers.
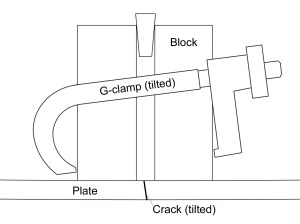
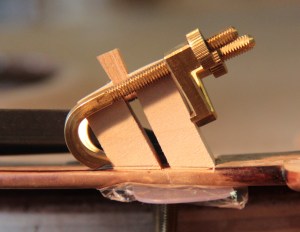
If a crack is not a perfect right angle with a clamp I tilted so that the pressure doesn’t cause two sides of the to slide out of place. Another option is to tilt the blocks to prevent slippage while glueing.
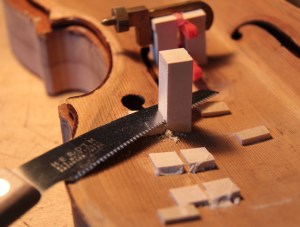
To achieve maximum bond strings I reheat the crack after leveling. Melting the two layers of blue Joan together create a stronger bond. Then I removed the blocks by sawing them down, then cutting shavings from them until the thickness is down to about 0.5 mm. Then I soak and remove the rest with a blunt (opening) knife.
If some part of the crack is not perfectly level after gluing, I soak them until the glue has re-gelled. This will take around 2 ½ hours for a violin. If the area to be corrected is longer than 3 cm, I divide it into sub sections and correct them over the course of several days.
Then I warm the crack from the varnish side and push it level of using my fingers. I press the plate into a slightly warm plaster cast if available with a soft custom shaped PVC backing. I do this for about 10 minutes until the glue has re-gelled.. Leaving the plate in this situation forward too long will result in a sunken area along the crack. After a further our it is safe to place the plate in the plasterer cost again and apply gentle pressure with a cold sandbag to avoid information while drying. I leave is that sandbag on overnight, at which point the crack is ready for reinforcements and retouching.
Glueing cracks – More control with tower blocks
This article has been updated and is featured in the ‘The Strad’ magazine September 2016.

You must be logged in to post a comment.